The Role of Cropping
Cropping an animal portrait photo is a crucial step in post-processing that can significantly enhance its impact. Here's a breakdown of how to approach it, incorporating various compositional guidelines:
The primary goal is to make the animal the undeniable focal point. Crop out anything that distracts from it. In most animal portraits, the eyes are the most expressive feature and should be sharp and in focus. Often, placing the eyes on a "power point" (intersection of rule of thirds lines) is highly effective. Just like with human portraits, avoid cropping directly at a joint (e.g., knee, elbow, neck, ankle). This can make the animal look dismembered or create an unnatural appearance. Cropping mid-limb or mid-torso is generally safer if you're not including the entire body. Shoot a bit wider than you think you need so you have more flexibility to crop later in post-production.
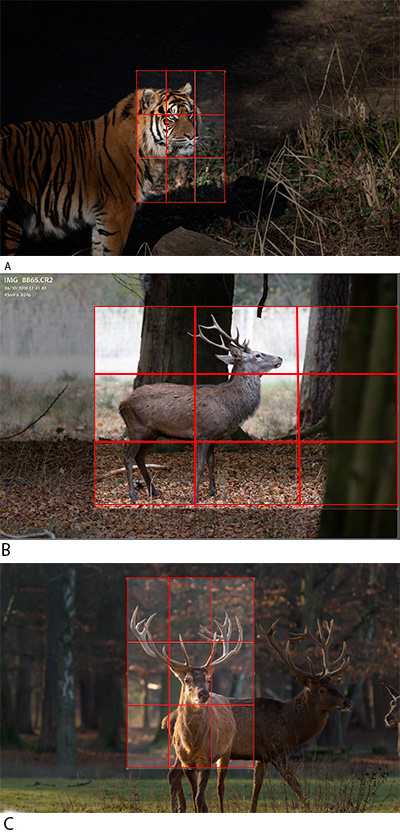
Imagine your image divided into a 3x3 grid by two horizontal and two vertical lines. This is known as the Rule of Thirds. Place the animal, or its most important features (like the eyes), along these lines or at their intersections (the "power points"). This creates a more dynamic and balanced composition than simply centering the subject. See photo #A as an example. If the animal is looking or moving in a particular direction, leave more negative space in that direction to give it "room to breathe" and enhance the sense of movement or gaze. See an example in photo #B.
Negative space is the empty or less detailed area around your subject. It's not just "nothing"; it's an intentional part of the composition. Using negative space effectively helps the main subject stand out by providing context, emphasizing its size, or creating a sense of isolation, peace, or even mystery. Ensure the negative space is clean and doesn't distract from the animal.
For a highly intimate and detailed portrait, you might choose to fill the frame almost entirely with the animal's face or a significant portion of its body. This creates a powerful impact, bringing the viewer very close to the subject. Be mindful not to crop too tightly so as to cut off essential features like ears or whiskers in an unflattering way.
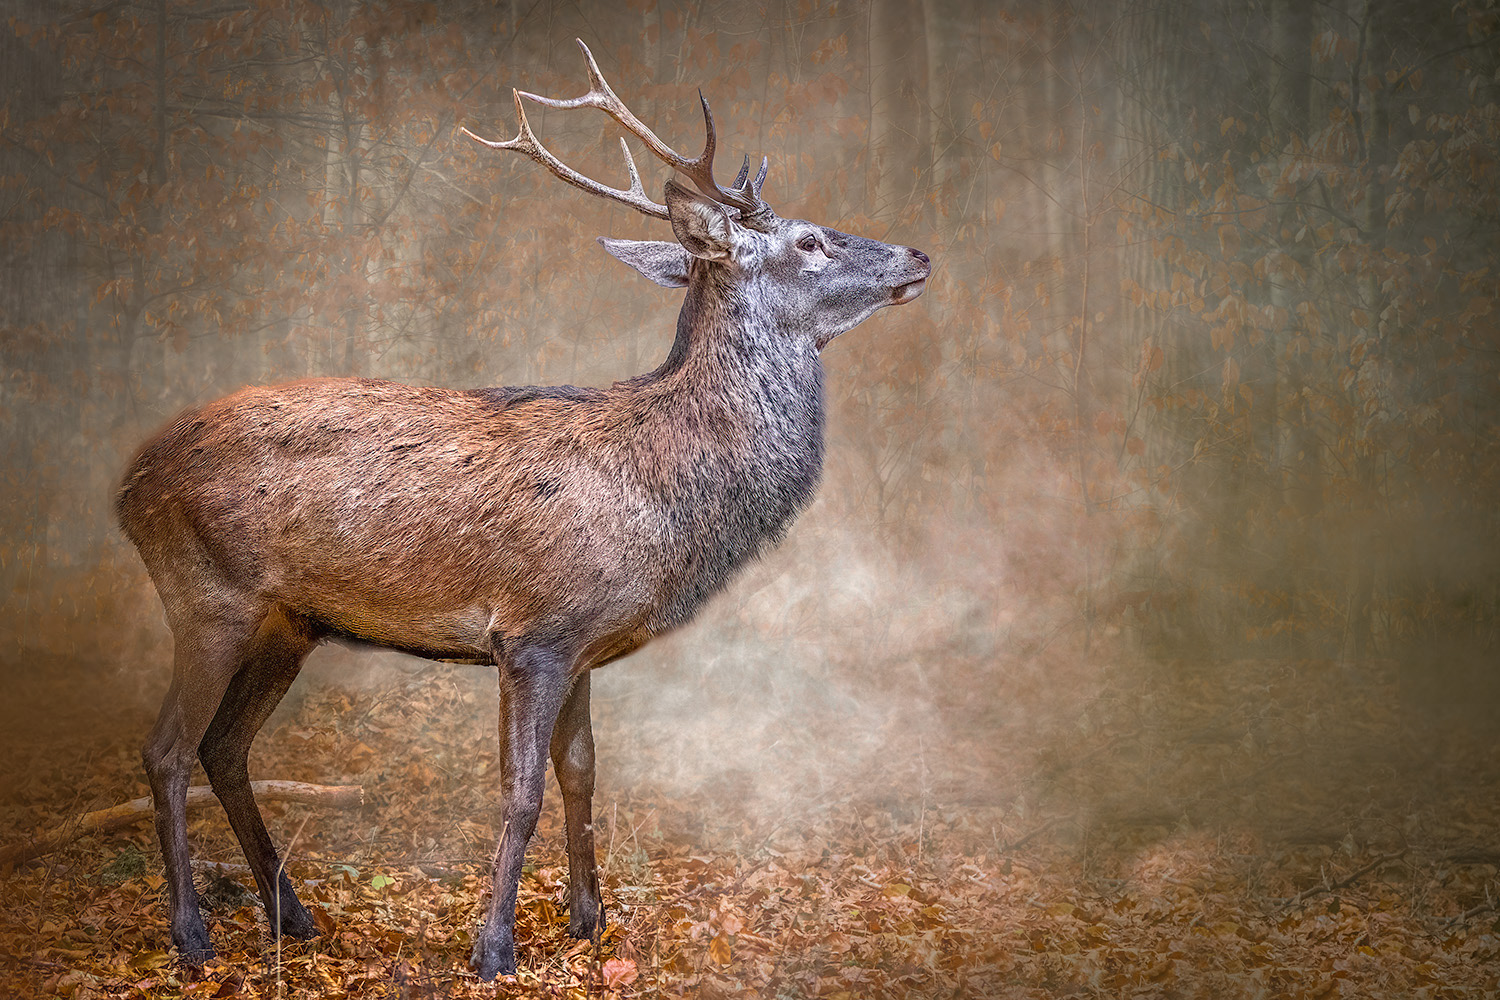
While the Rule of Thirds often suggests off-center placement, some animal portraits benefit from a symmetrical composition, especially if the animal itself is symmetrical (e.g., a deer with impressive antlers looking directly at the camera, or a peacock displaying its feathers). Centering can work well in these cases as seen in photo #C.
Cropping is an excellent tool for eliminating distracting elements from the edges of your frame, or even within the background.
Think about where the photo will be displayed (e.g., social media, print, specific website). Crop to suitable aspect ratios (e.g., 4:5 for Instagram, 2:3 for standard prints).
Following the initial capture, the post-processing of my animal portrait photos is meticulously carried out using Adobe Photoshop and Adobe Lightroom, allowing for precise control over every detail.
My workflow typically begins in Photoshop, where I make two additional layers of the original photo. One of these layers is specifically designated to represent the background. For this background layer, my aim is to introduce a pleasing blur that helps the animal subject stand out. I achieve this by using a combination of the Smudge tool and a Gaussian Blur filter. I find this method particularly effective because it allows for a more natural and artistic blending of the colors with the subject, creating a harmonious look. The degree of blur applied is a matter of personal artistic preference, varying from subtle softening to more pronounced diffusion. Occasionally, I selectively blend in some subtle details from the background; when I do this, I reduce the opacity on these details to ensure they remain understated and don't distract from the main subject.
For the topmost layer, I meticulously select the animal subject using Photoshop's intuitive Object Selection Tool and apply a layer mask. This precise selection ensures that any subsequent adjustments I make to the subject will not affect the blurred background.
Once these specific manipulations are complete in Photoshop, I seamlessly transfer the photo back into Adobe Lightroom. It is here that I make the final global adjustments to the image. This includes fine-tuning the lighting to optimize exposure and contrast, enhancing the color vibrance and accuracy, refining the sharpness to bring out intricate details, and applying noise reduction to achieve a clean and polished final portrait.