Frankfurt am Main, Germany
Capture the Urban Canvas: Your Guide to Breathtaking Skyline Photography
The city skyline – a captivating dance of light, steel, and ambition against the vast canvas of the sky. From the golden glow of dawn to the dazzling spectacle of twilight, capturing a city's silhouette is one of the most rewarding challenges in photography. It's about more than just pointing your camera at tall buildings; it's about freezing a moment of urban grandeur, telling a story of human ingenuity, and mastering the interplay of light and architecture.
To truly transform your urban landscapes from simple snapshots into stunning works of art, you'll need to go beyond the obvious. In this comprehensive guide, I'll dive deep into the crucial elements that shape a spectacular skyline shot:
Location & Composition: Discover how scouting the perfect vantage point and crafting a compelling composition can dramatically elevate your image, guiding the viewer's eye through the urban sprawl.
Format: Explore the artistic choices between panoramic sweeps and classic rectangular frames, understanding how each format can tell a different story about the city's expanse or its towering presence.
Time of Day: Unlock the magic of different lighting conditions and how to use the saturated hues of gold, orange, and red of the "golden hour" and the dark blue glow of the "blue hour" to profoundly influence the mood and impact of your photographs.
Camera Settings (Exposure, Aperture, ISO): Demystify the technical controls. I'll show you how to master exposure, aperture, and ISO to achieve stunning clarity, sharp details, and the perfect balance of light, ensuring every window gleams and every cloud dances just right.
By understanding how these interconnected factors affect the final outcome, you'll gain the confidence to capture the city in all its magnificent glory. Get ready to illuminate the urban landscape, one perfectly crafted frame at a time!

The Role of Location
Location and composition are arguably the most fundamental elements in cityscape photography. They are the twin pillars upon which your image's impact and storytelling ability are built, even before you press the shutter button.
Choosing the right location is about finding your canvas – the physical space that offers the potential for a captivating view. It dictates the subject matter, the scale, the available light, and even the mood of your photograph.
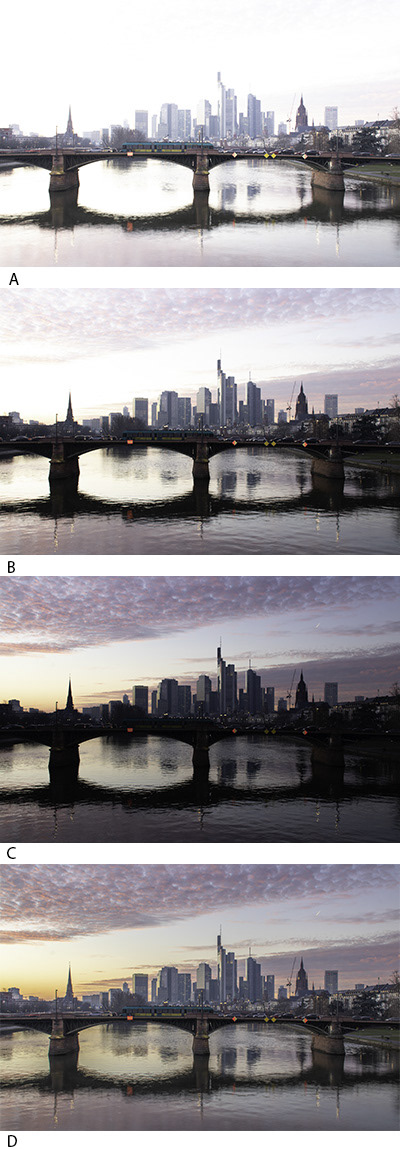
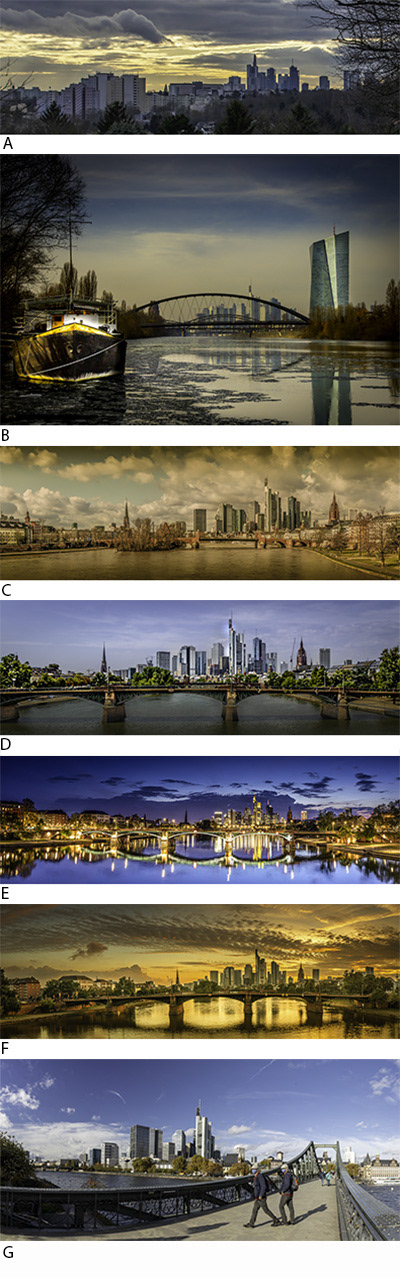
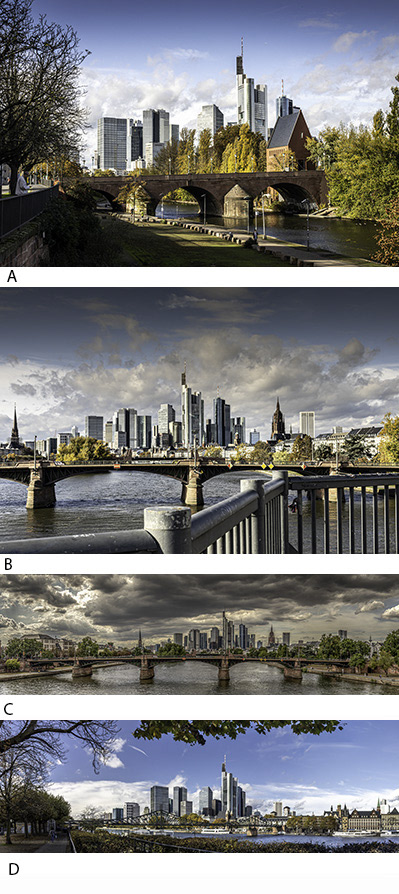
Observation decks, bridges, hills, or even upper floors of buildings offer expansive views. These are ideal for capturing a large portion of the skyline and emphasizing the city's scale. Rivers, lakes, or harbors often provide clear sightlines and the opportunity for stunning reflections, especially during golden or blue hour. Differences can be seen in the photos #A through #C.
Research where the sun will rise and set relative to your chosen skyline. This will determine whether you get front lighting, backlighting, or side lighting, each producing a different mood and effect. Mood changes based on the time of day can clearly be seen in the daylight photo #D, the blue hour photo #E or the golden hour photo #F.
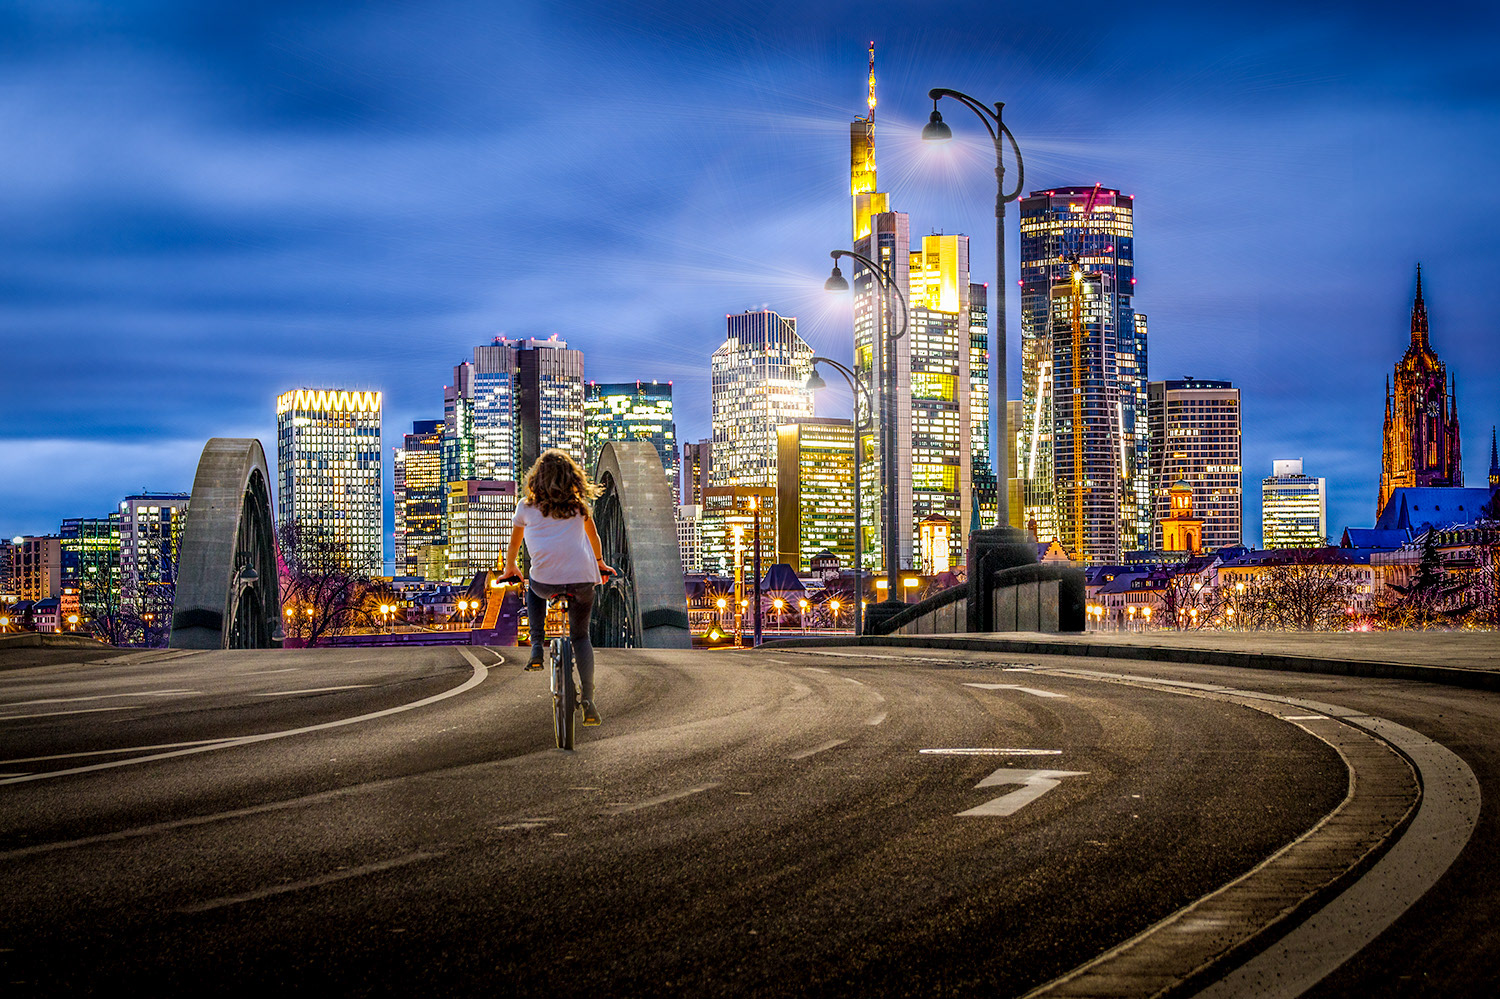
Look for foreground elements that can add depth and context to your skyline – a bridge, a park, a statue, or even people going about their day. Such as seen in photo #G.
Conversely, ensure there aren't distracting elements (power lines, ugly signs, messy construction) that will detract from your main subject.
Revisiting: The same location can offer vastly different photos depending on the weather, season, and time of day. Revisit locations to capture their changing moods.
The Role of Composition
Composition is the art of arranging elements within your frame to create a visually appealing and impactful image. It's how you guide the viewer's eye, create balance, and convey emotion or a narrative.
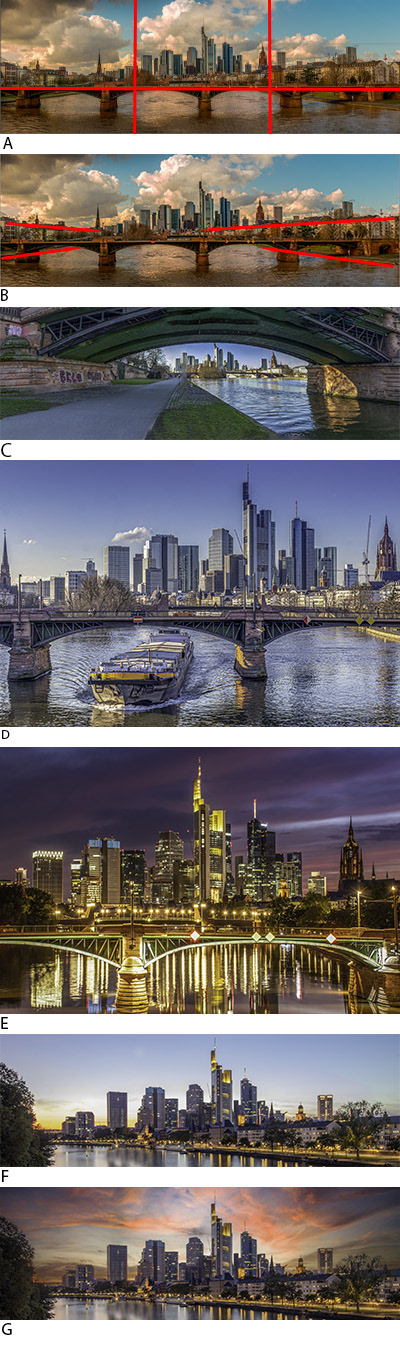
Imagine your frame divided into a 3x3 grid. This is known as the Rule of Thirds. Placing key elements (like the horizon, a dominant building, or a focal point) along the grid lines or at their intersections often creates a more balanced and dynamic image than simply centering everything. Notice in photo #A how the bridge is placed on the lower grid line and how the main group of buildings are placed centered between the two horizontal grid lines?
Look for natural or artificial lines (roads, bridges, rivers, building edges, light trails from cars) that draw the viewer's eye from the foreground, through the midground, and towards your main subject (the skyline). These are known as Leading Lines which add depth and visual flow. In photo #B the left and right river banks and rows of buildings are both sources of leading lines drawing the viewer toward the center of the photo.
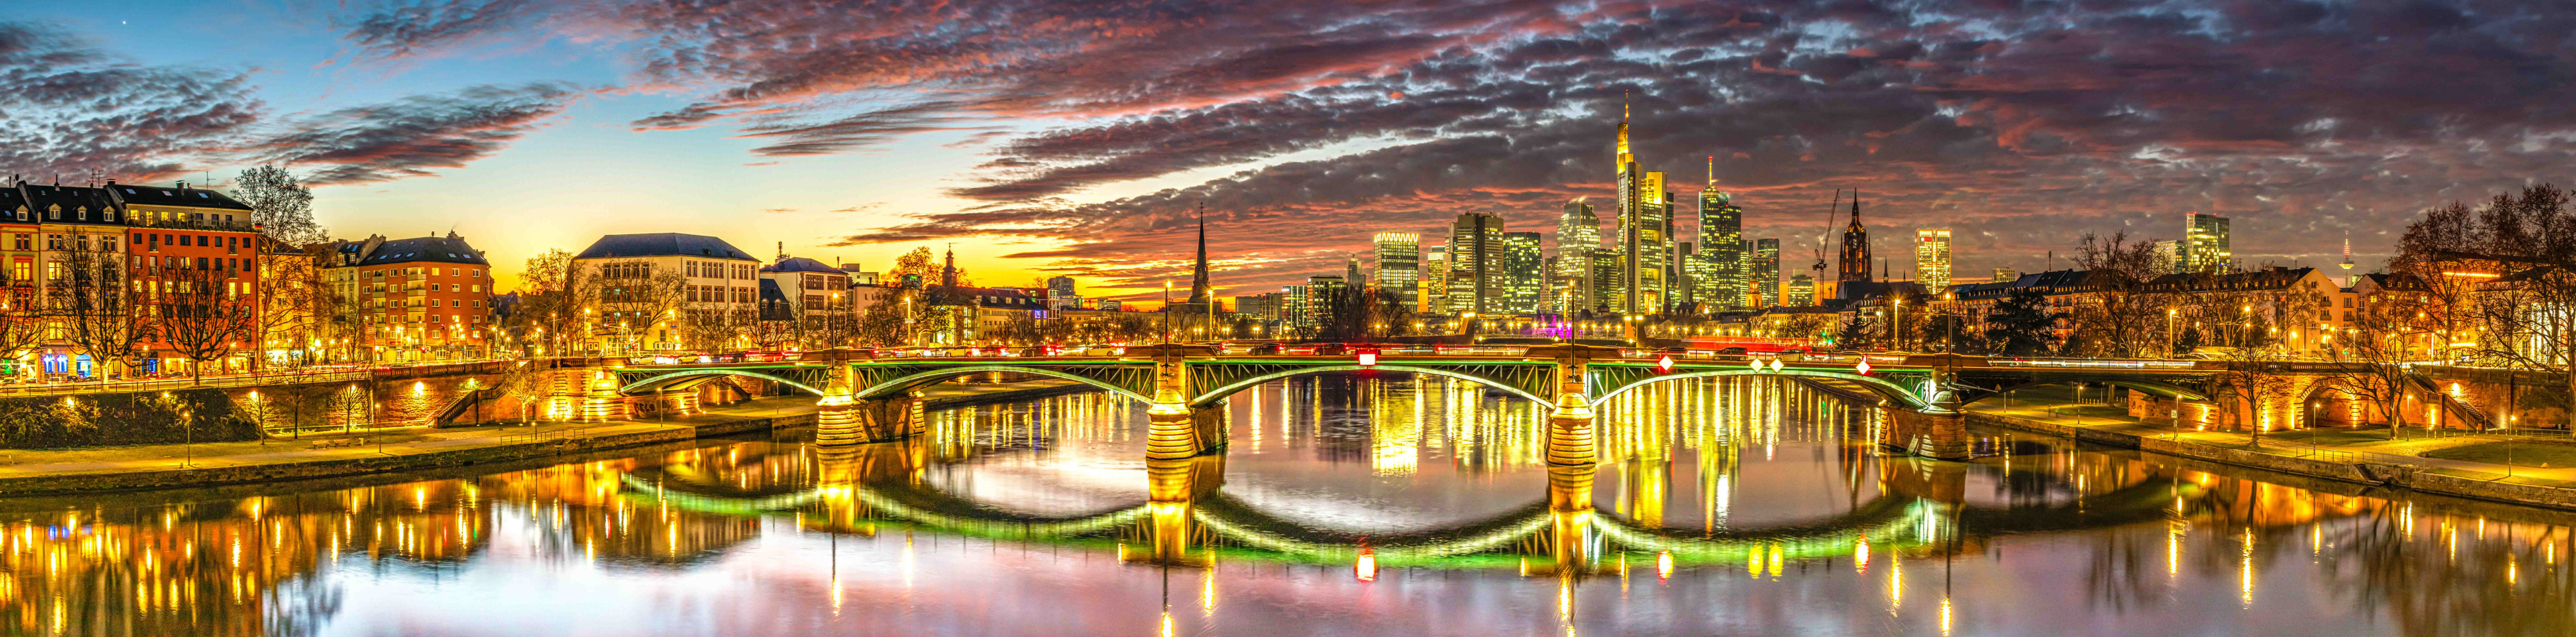
Use elements within the scene to create a "frame" around your skyline – an archway, trees, another building, or even a window. This can add depth, context, and focus attention on the main subject. Photo #C is an example of framing.
Incorporating interesting elements in all three planes (foreground, midground and background) helps create a sense of depth and dimension, preventing the image from looking flat. The skyline itself is often the background or midground, so a strong foreground is key. The boat in the foreground, the bridge in the middle ground and the skyline in the background of photo #D create a new depth in the scene.
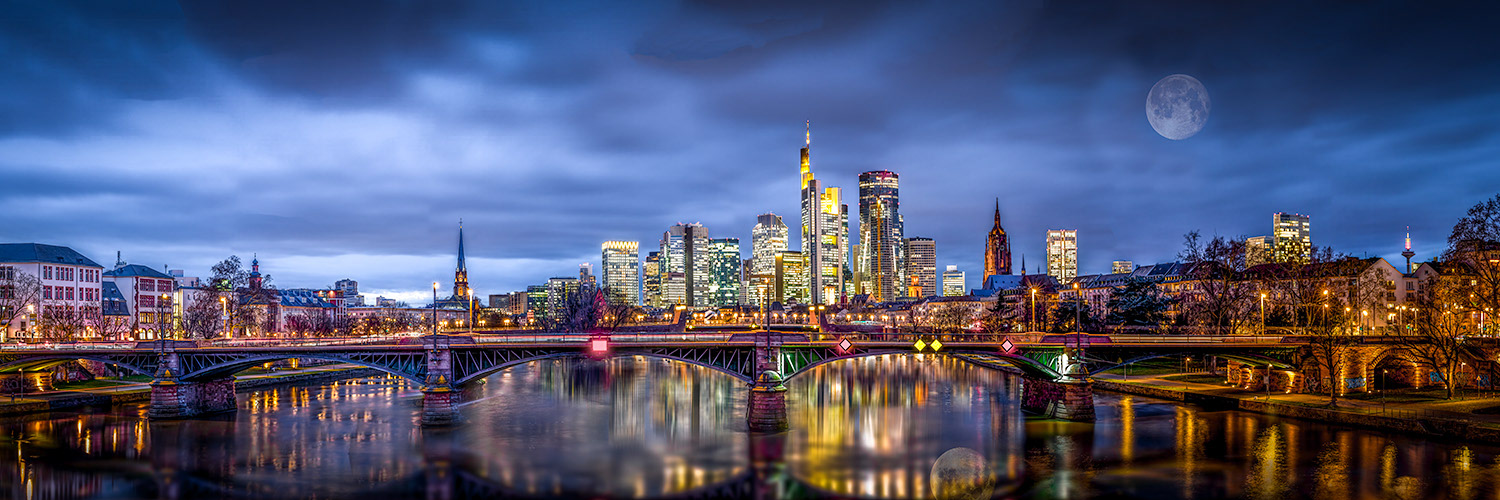
Use calm bodies of water or reflective glass buildings to create striking symmetrical compositions. As can be seen in photo #E.
Repetition: Look for repeating patterns in architecture, windows, or streetlights that can add visual rhythm and interest.
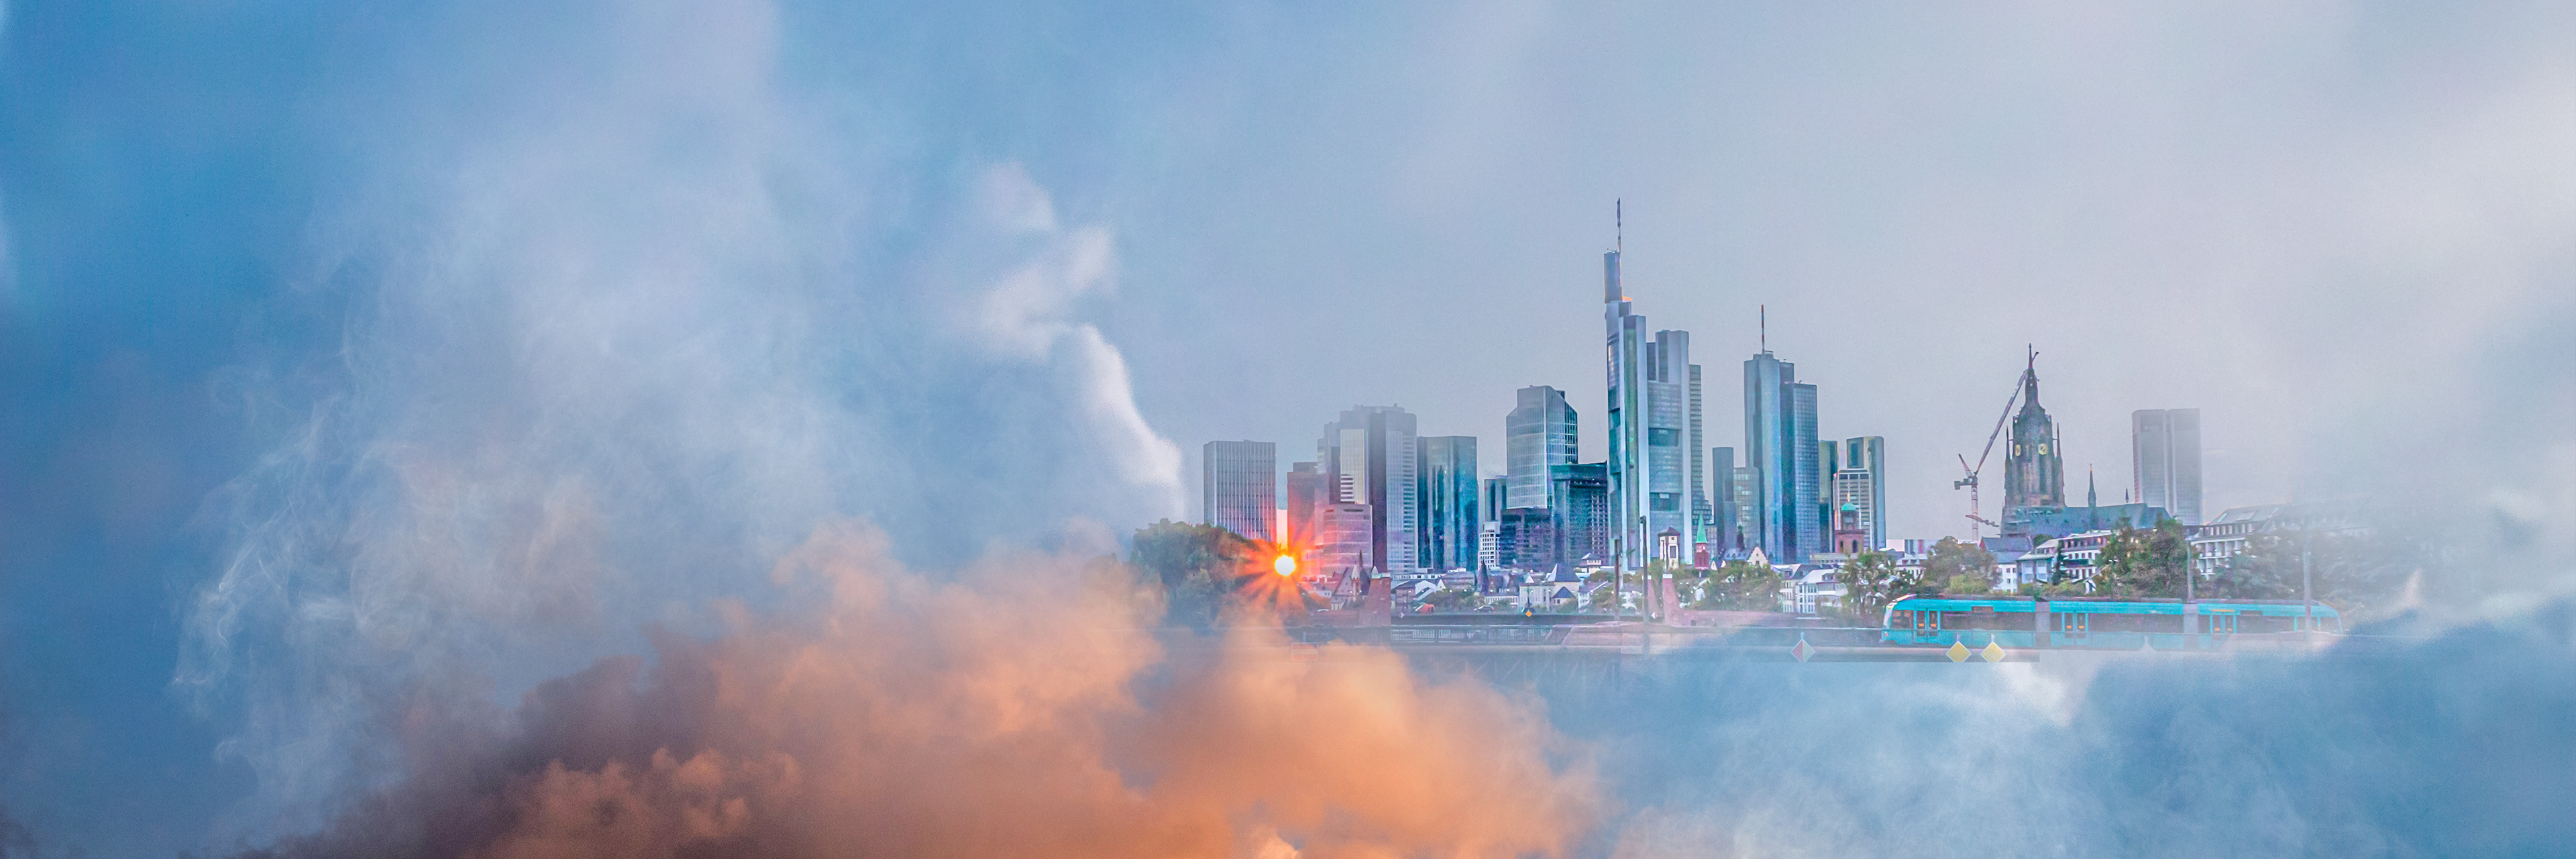
Sometimes, what you don't include is as important as what you do. Using negative space (empty sky, a muted foreground) can highlight your subject and create a sense of calm or grandeur. An example of negative space in the sky is shown here in photo #F. I personally, prefer to add drama or at least some details, by adding clouds to the sky. This can be done in post processing with Adobe Photoshop as seen in photo #G.
By diligently considering both your location and the principles of composition, you'll move beyond simply documenting a city and begin creating truly artistic and compelling cityscape photographs.
The Role of Format (Aspect Ratio)
When we talk about "format" in photography, especially in the context of composition, we're primarily referring to the aspect ratio of your image. This is the proportional relationship between the width and the height of your photograph.
For skyline photography, the aspect ratio plays a crucial role in how you frame the city, the sense of scale you convey, and the overall aesthetic impact of your final image. Specifically 3:1 (a very wide panoramic) and 3:2 (a common standard rectangular format). Let's break down the role of format, focusing on these two examples.
The format dictates the boundaries of your visual story. A wider format emphasizes breadth and vastness, while a more traditional rectangular format can highlight height and density.
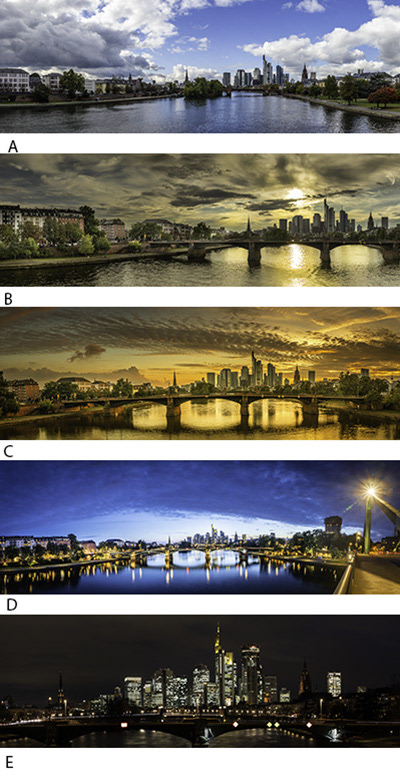
The 3:2 aspect ratio is the most common format for digital SLR and mirrorless cameras, mirroring the traditional 35mm film frame. For every 3 units of width, there are 2 units of height (e.g., 6000x4000 pixels, 12x8 inches print). It fits most screens, print sizes, and frames without awkward cropping, making it ideal for general use in your portfolio. Use 3:2 when the skyline has prominent, tall structures you want to emphasize or when you want to include significant foreground or sky elements as part of the composition. Examples of the 3:2 format can be seen in photos #A and #B.
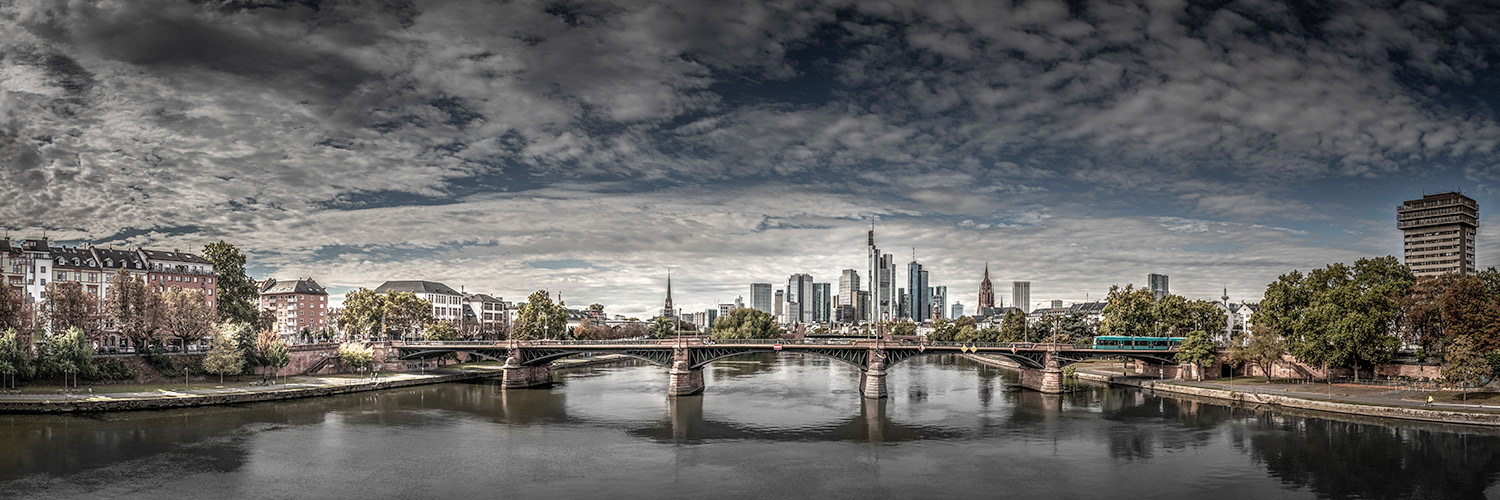
The 3:1 aspect ratio is a highly elongated, "letterbox" style, much wider than traditional formats. It's often achieved by stitching multiple images together (a panorama) or by significant cropping from a wider original. For every 3 units of width, there is only 1 unit of height (e.g., 9000x3000 pixels, 24x8 inches print). This format excels at conveying the immense scale and vastness of a city that stretches horizontally across the landscape. It draws the viewer's eye across the entire scene, creating a highly immersive and cinematic feel. It naturally emphasizes the horizontal line of the skyline, making it the dominant feature by minimizing excessive sky or foreground that might not be adding to the composition. A tight panoramic crop can effectively remove these distractions, focusing purely on the urban sprawl. Panoramas often feel unique and impressive, making a strong statement, especially when printed large. Use 3:1 when the city skyline is very spread out and extends significantly from left to right or from very distant vantage points where you want to capture the entire urban "ribbon." For images intended for very wide displays or impactful wall art. Examples of the 3:1 format can be seen in photos #C and #D.
In essence, the format isn't just a technical detail; it's a powerful compositional tool. By deliberately choosing between a 3:2 rectangle and a 3:1 panorama, you're making a conscious artistic decision about how your cityscape will be perceived.
The Role of Time of Day
The time of day is perhaps one of the most transformative elements in cityscape photography. It completely dictates the quality, color, and direction of light, profoundly influencing the mood, atmosphere, and visual impact of your photographs. Mastering the different phases of the day allows you to capture the city in a myriad of captivating ways.
Here's how different times of day play a crucial role:
1. Daylight (Mid-Day / Harsh Sun)
While often considered less ideal for fine art photography, daylight has its moments and can be leveraged. The sun is high in the sky, creating strong, hard shadows and high contrast between bright highlights and deep shadows. The light tends to be bluer, especially on clear days, and can make colors appear desaturated. The direct overhead light can flatten out scenes, reducing the sense of depth and form. Use the strong shadows creatively to create dramatic patterns, abstract shapes, or strong visual interest. Look for interesting light and shadow play. High-contrast daylight scenes can translate beautifully into powerful black and white images, where texture and form are emphasized. Avoid shooting directly into the sun during mid-day, as it can lead to blown-out highlights and silhouetted buildings unless that's your artistic intent. Photo #A was taken in the mid-day hours.
2. Late Afternoon (Pre-Golden Hour)
As the sun begins its descent, the light starts to improve significantly. The sun is lower, creating longer shadows that add dimension and texture to buildings. The light begins to warm up slightly, moving away from the harsh blues of mid-day. This time of day offers a more pleasing, balanced light for capturing the entire cityscape without extreme contrasts. This is an excellent time to fine-tune your composition, as the changing light and shadows will give you a preview of what's to come in the golden hour. Photo #B is an example of a photo taken in the pre-golden hour.
3. Golden Hour (Magic Hour)
This is a universally beloved time for photographers, occurring shortly after sunrise and just before sunset. Often lasting only 20-60 minutes. The sun is low on the horizon, filtering through more atmosphere, which scatters harsh blue light and allows warmer red and orange tones to dominate. Everything is bathed in a beautiful, warm, golden glow. Shadows are elongated but less harsh than mid-day, adding depth and dimension without obscuring details. The low angle of the sun allows for creative backlighting, rim lighting, and side lighting effects. When shooting towards the sun (with a narrow aperture like f/16 or higher), you can often create beautiful sunburst effects. Position the city between your camera and the low sun for dramatic silhouettes against a vibrant sky. The warm colors of the golden hour can be seen in photo #C.
4. Blue Hour (Twilight)
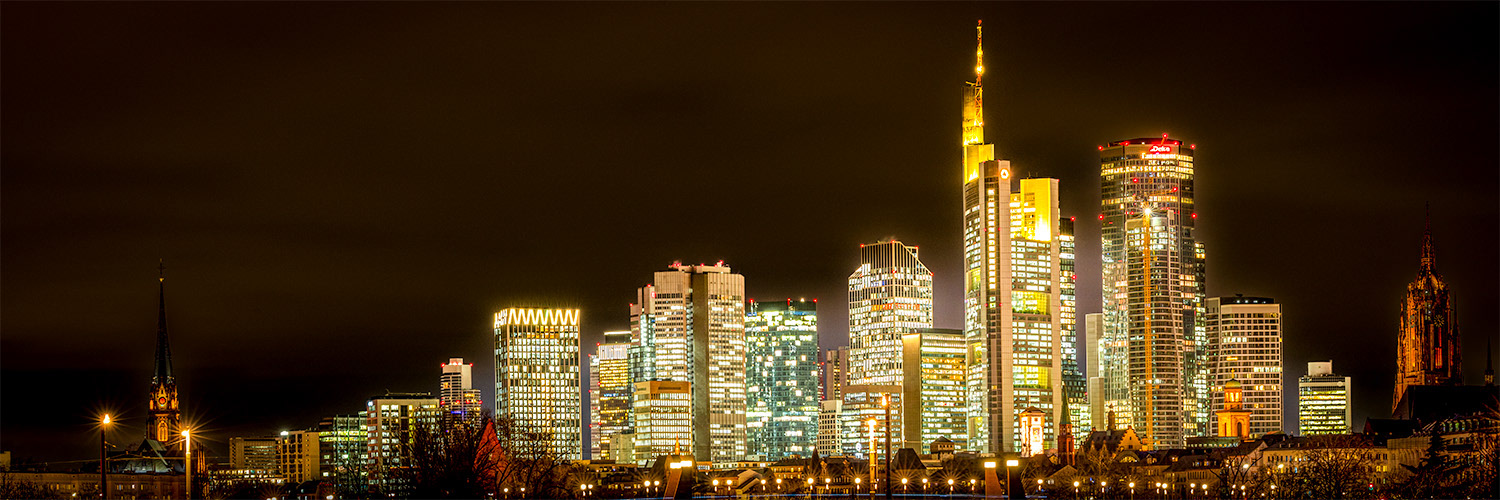
Following sunset (or preceding sunrise), the blue hour offers a magical transition where artificial city lights begin to balance with the ambient sky light. Like golden hour, blue hour is brief. The sun is below the horizon, but there's still enough ambient light to create a rich, deep blue tone in the sky (the "blue hour" actually happens because the longer, warmer wavelengths of light have been scattered, leaving the cooler blue light). City lights, street lamps, and building illuminations begin to pop, creating warm points of light that contrast beautifully with the cool blue sky. Since the sun isn't directly visible, there are no hard shadows. This is the prime time when the brightness of the sky often balances perfectly with the brightness of artificial lights in the city, making it easier to achieve a well-exposed image across the entire dynamic range. Longer exposures are usually required, making a sturdy tripod indispensable. The blue hour is shown here in photo #D.
5. Darkness (Night)
Once the ambient sky light is gone, you're relying entirely on artificial illumination. The sky becomes truly black, or very dark, acting as a backdrop for the city lights. Buildings are illuminated, neon signs glow, and streetlights create strong points of light. The contrast between bright lights and deep shadows can be extreme, requiring careful exposure. Wet streets after rain, or bodies of water, can create mesmerizing reflections of the city's lights. Longer exposures may produce higher levels of noise, requiring good noise reduction in post-processing. Small apertures (f/11 or higher) can turn bright point lights into starbursts. The dark sky often creates an unwanted area of negative space which must be filled in with stars in post-processing. View photo #E to see the results of a cityscape at night.
By understanding these distinct characteristics and planning your shoot around these critical times, you can elevate your cityscape photography from simple snapshots to powerful, evocative works of art.
Mastering Exposure from Dawn to Dusk
Capturing the dynamic beauty of a cityscape requires a nuanced understanding of your camera's exposure triangle: shutter speed, aperture, and ISO. The optimal settings shift dramatically with the changing light, from the soft glow of dawn to the vibrant lights of night.
Aperture: Balancing Depth and Light
While it might seem intuitive to use a wide-open aperture (low f-number) to maximize light and achieve faster shutter speeds, especially when the cityscape is at a distance, this isn't always the ideal approach for cityscapes. Sometimes, in cityscape photography, where the goal is to render the entire scene, from foreground elements like streets or buildings to the distant skyline, as sharp as possible, a narrower aperture (higher f-number like f/8 to f/16) is generally recommended. This provides a greater depth of field, ensuring more of your image is in crisp focus.
Shutter Speed: Painting with Light and Motion
Shutter speed is your primary tool for controlling how motion is rendered and how much light reaches your sensor. During the bright hours, you'll typically use faster shutter speeds to correctly expose the scene and freeze any motion. This might range from 1/250th of a second to much faster, depending on the intensity of the light. As the light softens, in the late afternoon, the golden hour and the blue hour, you'll naturally need slower shutter speeds. This is where a tripod becomes invaluable. You might find yourself in the range of 1/30th to several seconds, allowing for a pleasing blur in moving elements like cars while keeping buildings sharp. For night cityscapes, long exposures (often several seconds to 30 seconds or even minutes using Bulb mode) are essential to capture the dim light, create stunning light trails from vehicles, and reveal details in the shadows. This is where the challenge of noise arises.
ISO: The Sensitivity Sweet Spot
ISO controls your camera's sensitivity to light. The general rule for cityscapes, and most photography, is to keep your ISO as low as possible (typically ISO 100 or 200) to minimize digital noise and maximize image quality.
The goal here is to balance all three settings. Set your ISO to the lowest value which still allows an acceptable shutter speed. Set your aperture to the widest opening while maintaining sharpness throughout your photo and still allowing for an acceptable shutter speed. Set your shutter speed to a value which properly exposes your photo. Be careful of clipping in shadows and highlights.
The Challenge of Dynamic Range: Preventing Clipping and Noise
Cityscapes, especially during sunrise, sunset, or at night, often present a high dynamic range—a vast difference between the brightest highlights (e.g., streetlights, bright sky) and the deepest shadows (e.g., unlit buildings, under bridges).
Clipping: If your exposure is too bright, highlights can "clip," meaning they lose all detail and become pure white. This often occurs with artificial lighting. Conversely, if too dark, shadows can "clip" and become pure black, losing all detail and often exhibiting significant noise when brightened in post-processing.
Shadow Noise: The darker areas of your image are more prone to noise. When you try to recover detail from underexposed shadows in editing, this noise becomes much more apparent.
To effectively manage high dynamic range and prevent both highlight clipping and shadow noise, High Dynamic Range (HDR) photography is highly recommended. HDR involves taking multiple exposures of the same scene at different brightness levels (e.g., one underexposed for highlights (photo #C), one correctly exposed for midtones (photo #B), and one overexposed for shadows (photo #A)). These images are then combined in post-processing to create a single image with detail across the entire tonal range, resulting in a balanced exposure, rich colors, and significantly reduced noise in the shadows. For stationary cityscapes, HDR is a powerful tool to capture the full spectrum of light and detail that the human eye perceives. The result is photo #D.